


Main differences between RS-232, RS-422 and RS-485 (part 2)
Description of the RS-422 interface
The RS-422 interface is similar to RS-232 because it allows the simultaneous sending and receiving of messages on separate lines (full duplex), but uses a differential signal, i.e. the potential difference between conductors A and B.
The speed of data transfer in RS-422 depends on the distance and can be from 10 kbit / s (1200 meters) to 10 Mbit / s (10 meters).
The RS-422 network can consist of only one transmitting device and a maximum of 10 receiving devices.
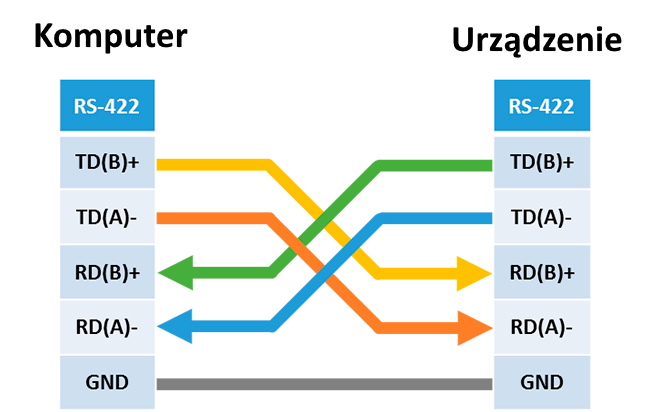
The RS-422 line consists of 4 wires for receiving and transmitting data (2 twisted wires for transmission and 2 twisted wires for receiving) and one common wire GND.
Twisting wires (twisted pair) between themselves allows you to get rid of the interference, because the interference affects both wires in the same way, and the information is extracted from the difference in potential between conductors A and B on the same line.
Voltage on data lines can be from -6 V to +6 V.
Logic 0 corresponds to a difference between A and B greater than +0.2 V.
Logic 1 corresponds to a difference between A and B less than -0.2 V.
The RS-422 standard does not define a specific type of connector, usually it can be a terminal strip or a DB9 connector.
Pinout RS-422 depends on the device manufacturer and is indicated in its documentation.
When connecting the RS-422 device, make the crossing of RX and TX contacts, as shown in the figure below.
Since the distance between the receiver and the RS-422 transmitter can reach 1200 meters, a special 120 Ω termination resistor or "terminator" is placed to prevent signal reflection from the end of the line. The resistor is installed between the RX + and RX contacts at the beginning and end of the line.
How to check the operation of RS-422?
To test devices with RS-422, it is better to use a converter from RS-422 to RS-232 or USB. Then you can use the software to work with the COM port.
Next, go to the interface RS-485